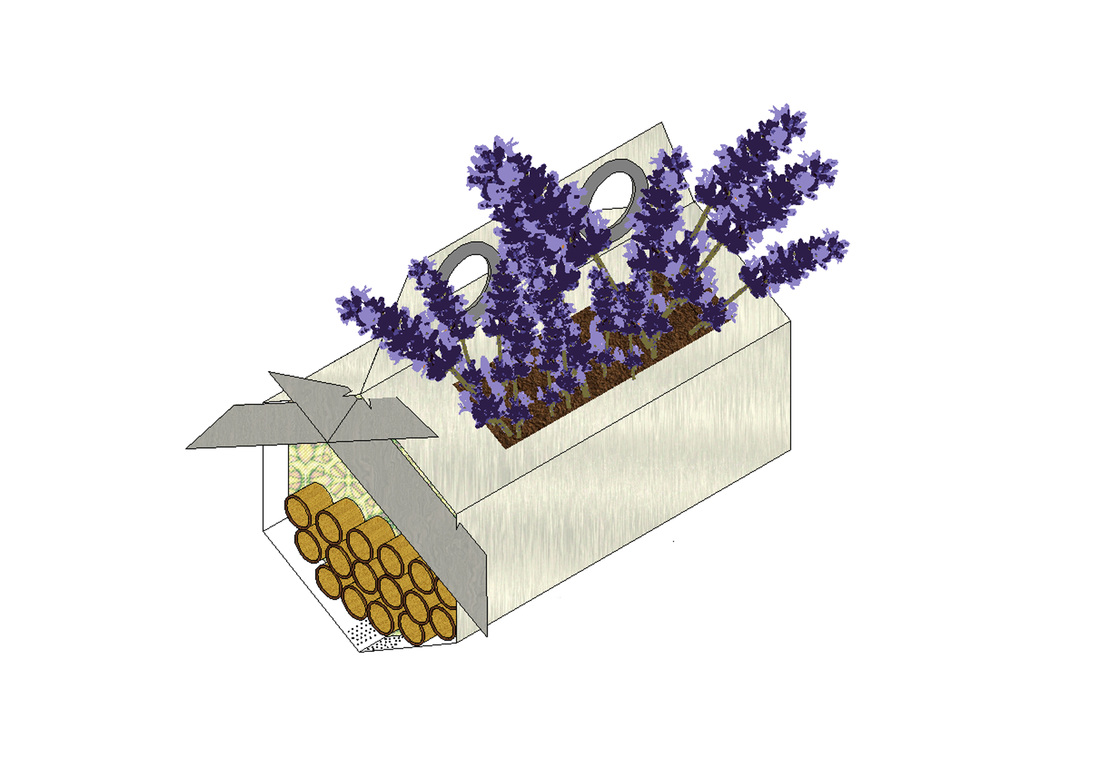
Refining my design idea

Basic finished product idea
After the sketch modelling I have a much better idea of what the finished product is going to be like although there are still a lot of refining to do. The parts I know for sure ill be needing to create the main body of the product are:
- 1 outer wrapping (to hold the product together and provide the shell of the structure)
- 3 inner wall slots (to hold the nest tubes and provide the inner structure)
- 1 slot in roof (to protect the entrance to the nest tubes from weather and predators)
The design I have created below involves folding the end panel inside itself and then secured. The sketch model I designed was simply stapled together, which is not what I want for the final product (for one thing it would rust). I need to change the design in terms of how it folds together or think of another component I could use to secure it. If i am going to fold it inside itself ill need to take this into account when creating the inner walls as it will be a smaller space.
Another design problem is that at the moment all the edges of the material are exposed to the elements, meaning that water will be soaked up around the ends of the product and cause the layers to swell and break apart. To combat this I will have flaps around all the edges which folds inwards (like on the tetra brik).

First template design
Changes
- Instead of folding a flap inside itself im having it folding over the handle and secured by two plastic eyelets. This change will hold the wrapping together more securely and will also stop the wrapping pulling itself apart when weight is applied inside. The eyelets will also stop the string attaching from the eyelets to the walls/fence ripping through the material overtime.
- Using Plastic eyelets on the top handle will also stop moisture soaking in around edges of the holes. I purposely chose camping eyelets as these are designed to be exposed to the elements.
- I have put flaps around all the exposed edges of the wrapping as i proposed.

Further changes
- Changed the shape of the plant holes to make them aesthetically pleasing (squares were boring)
- Added a space between the top two flaps to accommodate the material which will be sandwich between them
- changed the angle of the flap edges to ensure they wont overlap the paper when folding
Need to do...
- find out the thickness of the card in mm
- work on the inner wall design
- do more modelling to test my templates
- add the slots for the roof
- measure the material i am using and resize the slots to fit the walls

New template with changes.
Made on 2D design
Card measurements
In order to finish the net I need to know the space i need to leave between the handles, which can only be known by working out the thickness of the paper using vernier callipers and converting that into mm. Ill need to leave a space to accommodate two sheets.
Paper im using has a GSM of 290
290gsm = 380 microns = each sheet is 0.38 mm thick
0.38 X 2 = 0.76mm
Now i know this measurement i can adjust the net, originally i took a guess at 1mm, which was too large meaning there was an over hang.
I have also decided that im using o.6mm thick polypropylene so can also amend the slot holes
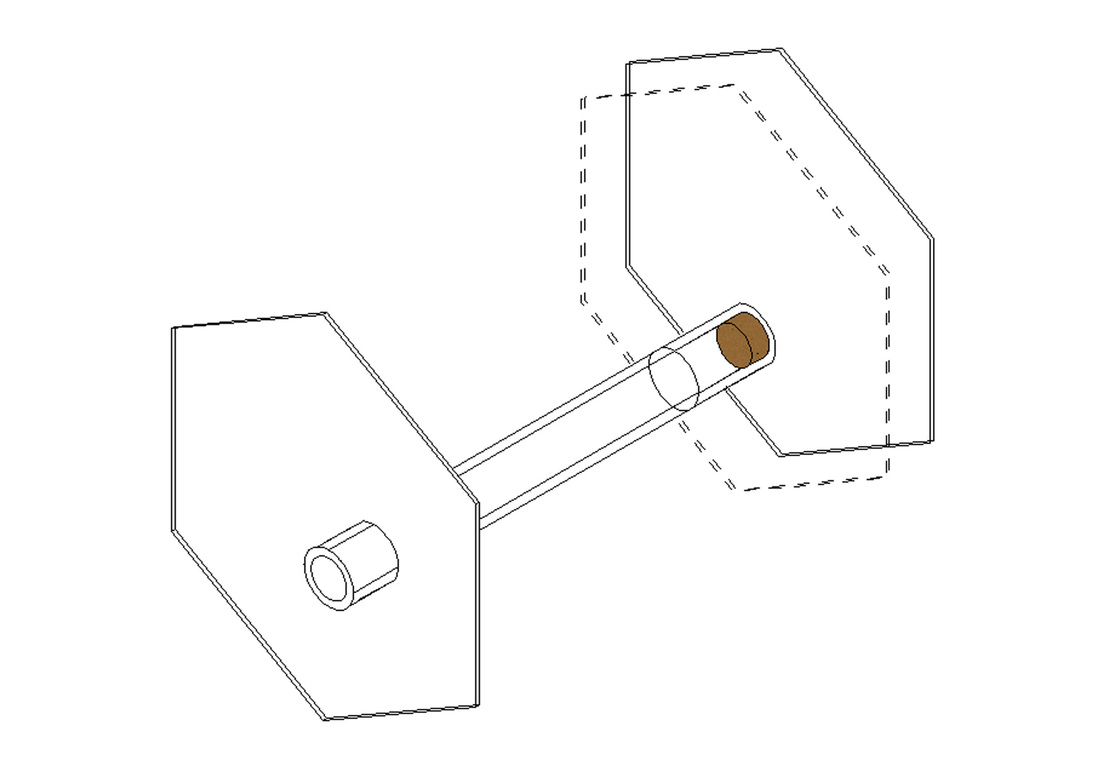
also .....How am I going to seal the ends of the tubes?
I seemed to have totally overlooked this very important aspect!
I've decided to use cork to make little plugs for the ends of the tubes as it its light, elastic, and impermeable to most liquids, it is also rot resistant!
I've thought how I am going to cut out such tiny little pieces of cork!....its too intricate to be cut with a scalpel. It is a possibility to cut it out using the fret saw but again would need a very steady hand. After a little think I'm going to try and see if I can cut them out using the pillar drill or pushing a metal bar of the correct size through the material..... Ive also asked if i can try and cut it on the laser cutter however I am not sure that it'll work..
Whilst on the subject of nest tubes, I've also realised that when sellers refer to the diameter of the canes that includes the thick rim and not just the hole in the middle. I need the canes to be between 7-12mm wide to be suitable for the bees therefore I have order bamboo cane at 12-14mm to allow for the outer rim.
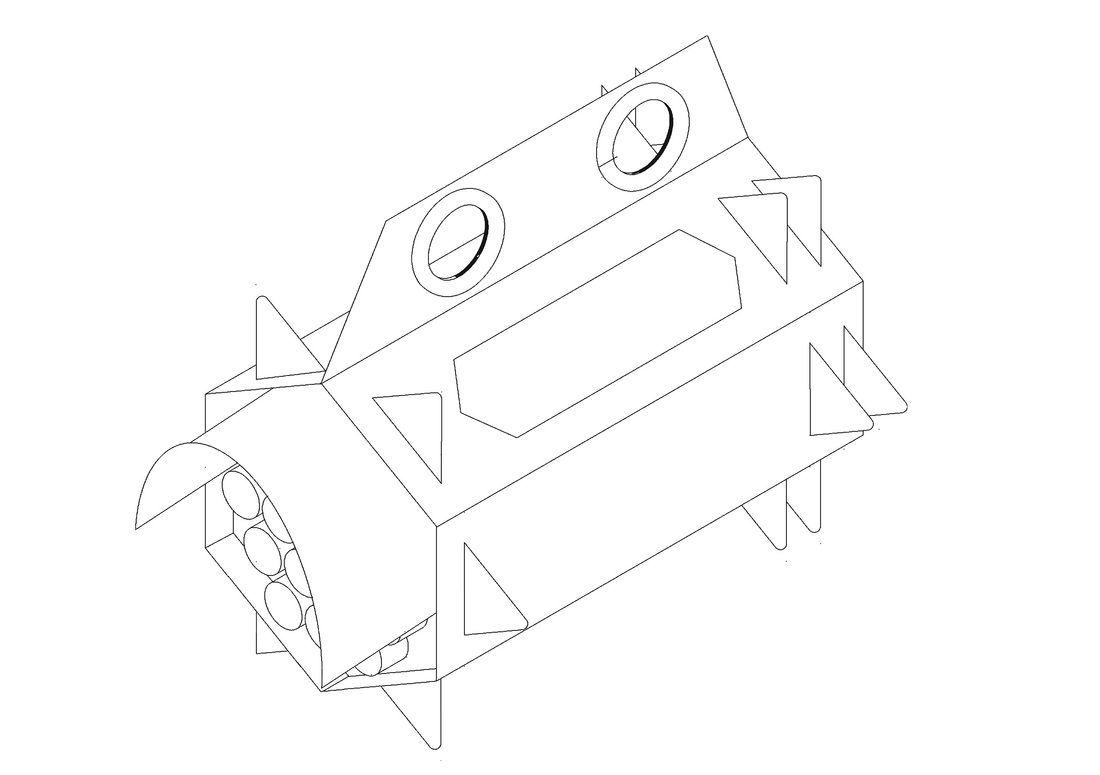
How the net tubes fit into the product
Inner walls
I have redesigned the inner walls to house the required amount of nest tubes (12) and that they are of the correct size. I need to do a mock up of the final design as im starting to think that ive made the triangular slots too large and they will stick out too far. However if this has no effect on the functionality of the design it could however give it a more interesting aesthetic and will keep them the same.
Another change ill make to this design is to round off the points of the slots to ensure they are not sharp and there less change of them bending when being pushed through or it is is free standing.
Another change ill make to this design is to round off the points of the slots to ensure they are not sharp and there less change of them bending when being pushed through or it is is free standing.

inner wall design
New wall slot design

Net changes
It seems so obvious now but when after folding my wrapping and then slotting the walls in place i kept finding that even though i had measured every side accurately the walls seem to not fit correctly (too large?) and the outer wrapping seemed to shorten. WHY!!?
It occurred to me that the fold lines should probably be the same thickness as the paper?
As a result of making the lines thicker this has changed the measurements inside the lines which means i will need to change the measurements of the inner walls.
After testing my net i also made the appropriate changes to the net such as correcting the size angles of the flaps which now fold over much easier and there is no overlapping the edges of the net.
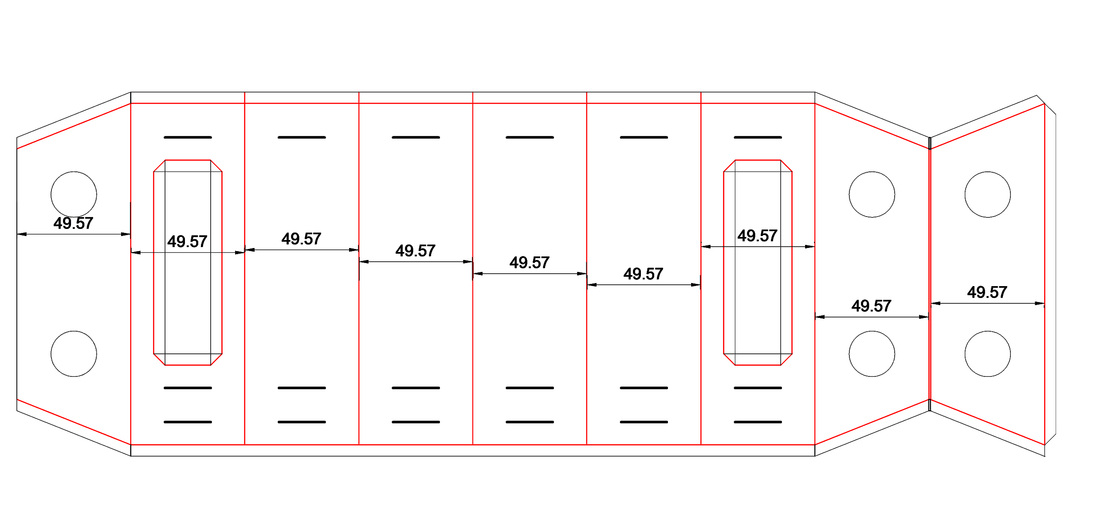

with the new net I felt that the end product was far too small, although it was a nice solid structure. I decided to go back and make the panels 60mm each and see if this improves the overall size.
I have also made the slot holes even wider as this makes it a lot easier when folding, although this means there are exposed holes which could let in water, therefore I should put some small holes in the bottom to stop water collecting.
Finally i made further changes to the flaps as I still had some of the angles wrong which caused there to be overhang.


Left 60mm panels, right 49.57mm
The 60mm size is much better, I asked a few people which size they felt was best and all agreed that the bigger one was better although the little was in their words 'cute'. There is also a much better space to accommodate the plant!
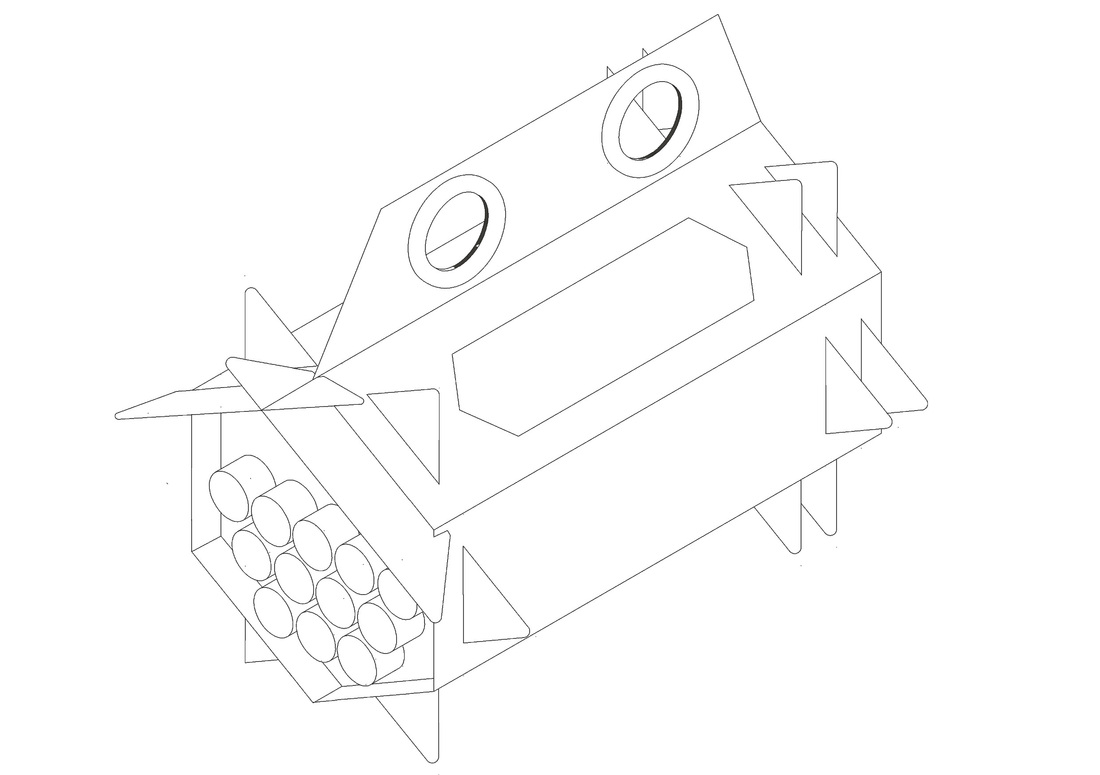
I need to cut out a net on the CAM1 as at the moment I am cutting by hand which I think is causing some inaccuracies and cannot get a true picture of the final product.
There are also still a few changes which need to be made:
I need to cut out a net on the CAM1 as at the moment I am cutting by hand which I think is causing some inaccuracies and cannot get a true picture of the final product.
There are also still a few changes which need to be made:
- The holes for the plastic eyelets need to be measured and changed on the net to fit correctly
- The inner walls still are not fitting 100% need to fiddle around with the measurements, however I cut the walls with scissors and a scalpel so could have affected the finished outcome.
- The eyelets holes need to be moved slightly downwards to hold the wrapping tighter together. I can also make the handles slightly narrower as they are unnecessarily wide.
- I've been thinking about the roof slots and I am going to see if I can cut the slots just into the roof panels without creating another slot in the wrapping or maybe need to change the roof design completely.
Changes to the roof

Original roof designs
Although I like the pitched roof design it isn't the most effective as it is a little unstable and there is a strong chance it could blow away if it became too windy. Also the cuts that need to be made to make the roof panels fit make the material floppy. I've reworked the roof to a design that is much more stable and added components to help keep it in place (snap fasteners)
however that has meant that I have to move my wall slots further inwards to make room for the holes for the snap clips to sit.
however that has meant that I have to move my wall slots further inwards to make room for the holes for the snap clips to sit.

new roof design
I originally intended to make holes in the wrapping and roof and clip a component through them and sandwich them together. this is not how the snap clips work and they are not long enough to fit all that material between them. The snap clips have to have one half of the snap clips on each of them and then press together. therefore I'm going to need to find out the appropriate adhesive to bond polypropylene togeather (see testing).
